Quick start
Quick start for StromPi 3:
You can find our detailed instructions, scripts and pre-installed images in our download area. However, you can also follow the quick instructions below to integrate your StromPi 3 into your existing system and get it up and running as quickly as possible.
In the most cases the jumpers on the board should be set as follows: CAP -> ON; Auto -> ON; SerialLess -> OFF; Flash -> OFF. In delivery state the microUSB input is set as primary and the Wide input as secondary voltage source.
Step 1: Update & activate serial communication
Step 1: Update & activate serial communication
First, update your package list and install the necessary dependencies using the following commands.
sudo apt-get update
sudo apt-get upgrade
sudo apt-get install python3-serial minicom python3-pip python3-pil python3-pil.imagetk python3-rpi.gpio stm32flash
Now open the config.txt file
sudo nano /boot/config.txtAdd the following three lines to the end of the file here:
dtoverlay=miniuart-bt
enable_uart=1
core_freq=250
Save file with the key combination CTRL + O, confirm with Enter and exit the editor with the key combination CTRL + X.
Now open the configuration of your Raspberry Pi with the following command:
sudo raspi-configDisable here, under the option 3 Interface Options, in P6 Serial port the serial login shell and enable the serial hardware.
Afterwards your Raspberry Pi should reboot automatically.
Alternatively, you can manually restart your Raspberry Pi with the following command:
sudo rebootStep 2: Download StromPi 3 configuration tool
Step 2: Download StromPi 3 configuration tool
To configure your StromPi 3 via the GUI tool, or even via the terminal, first download the script directory and unzip it with the following commands:
wget https://joy-it.net/public/StromPi3_Scriptfolder_2023-09-05.zip
unzip StromPi3_Scriptfolder_2023-09-05.zip
Step 3: Graphical configuration of the StromPi 3 (GUI tool)
Step 3: Graphical configuration of the StromPi 3 (GUI tool)
Now, navigate to the directory of the StromPi 3 GUI configuration tool with the following commands and start it:
cd StromPi3_Scriptfolder_2022-09-05/Config\ Scripte\ only\ main\ Version/V1.73/Config\ Script\ mit\ GUI/
sudo -E python3 strompi_config_gui.py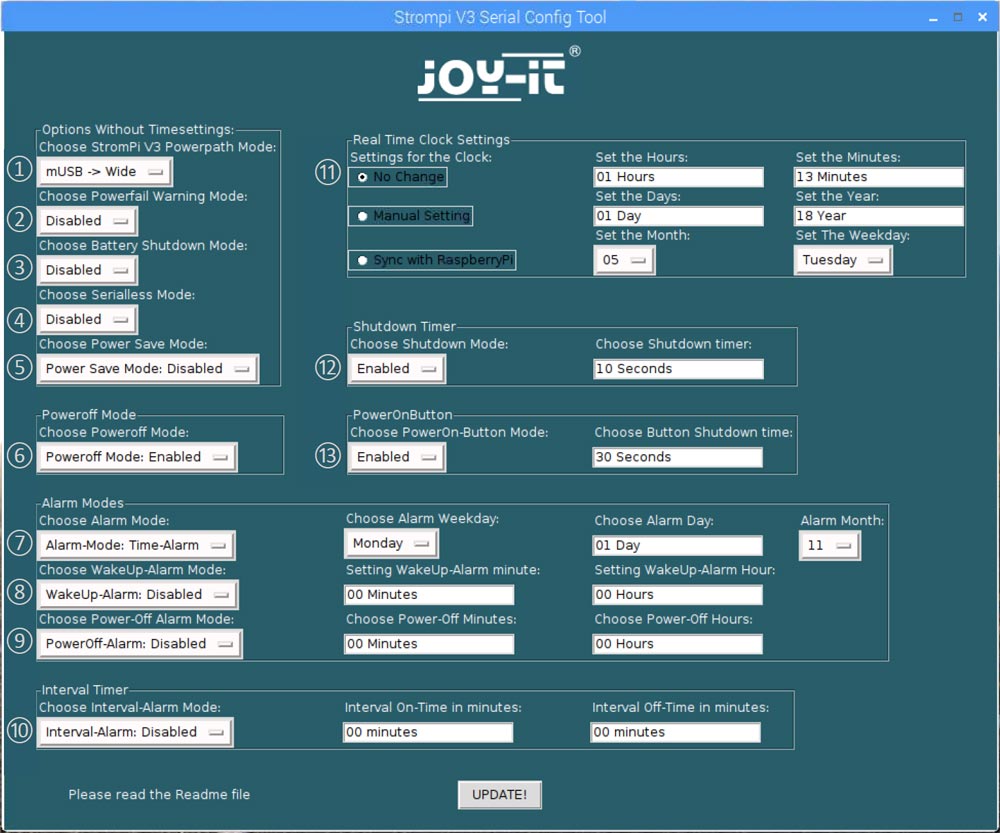
With the help of this tool you can comfortably make all settings on your StromPi 3. The functions of the tool are divided into:
- Select the StromPi 3 Powerpath Mode
- Enable or disable the Powerfail warning
- Set the Battery-Shutdown-Mode
- Enable or disable the Serialless-Mode
- Enable or disable the Power-Save-Mode
- Enable or disable the Poweroff-Mode
- Set the Alarm-Mode
- Set the WakeUp-Alarm-Mode
- Set the PowerOff-Alarm-Mode
- Settings for the real time clock
- Enable or disable the Shutdown-Timer and set the time (in seconds)
- Enable or disable the PowerOn-Button-Mode and set the time (in seconds)
Attention! If you want to start the graphical configuration via an SSH connection in combination with PuTTY, the installation of Xming as well as the activation of the X11 forwarding is additionally necessary. Detailed information about this can be found in our manual.
Step 4: Console-based configuration of the StromPi 3
Step 4: Console-based configuration of the StromPi 3
As an alternative to the GUI tool, you can also configure your StromPi 3 via the console.
To do this, navigate to the appropriate directory and start the console-based configuration with the following commands:
cd StromPi3_Scriptfolder_2022-03-23/Config\ Scripte\ only\ main\ Version/V1.73/Config\ Script\ ohne\ GUI/
python3 strompi_config.py
Step 5: Open the serial console
Step 5: Open the serial console
Detailed configurations, as well as analyses and system reports, can also be created directly in the serial console of the StromPi 3.
To do this, start the serial console of the StromPi 3:
sudo minicom -D /dev/serial0 -b 38400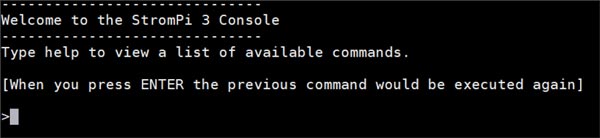
Type here the command startstrompiconsole or the abbreviation sspc and confirm it with Enter to open the console of the StromPi 3.
Attention! Please note that the typed characters are not displayed. Only after confirming with Enter the contents of the StromPi3 console are activated.
With the command show-status, you additionally open the current configuration setting. The command help gives you an overview of all commands.
Step 6: Scripts
Step 6: Scripts
The StromPi 3 scripts are needed to react to certain actions and to execute all functions of the StromPi 3. All scripts can be found in our download area. There are two different types of scripts available:
Serial scripts: The serial scripts read and send the required information via the serial port.
Serialless scripts: The serialless scripts use a GPIO pin for data transfer. This may be necessary if the serial interface is needed to transfer other data.
The following scripts are available:
Serial scripts
serialShutdown.py: This script shuts down the Raspberry Pi when the primary power supply fails. The script has its own shutdown timer. It specifies the time to wait to verify that the primary power supply has been restored before shutting down the Raspberry Pi. This is preset to 10 seconds.
shutdown.py: This script, when run, shuts down your StromPi and Raspberry Pi via the Poweroff command. The Poweroff command allows to start the StromPi via the WakeUp alarm.
RTCSerial.py: This script compares the time of the Raspberry Pi with the time of the RTC of the StromPi. The older time is overwritten with the more current time.
Poweralarm_serial.py: This script sends an email to the email address stored in the script when the primary power supply fails. Another email is sent when the primary power supply is restored or the Raspberry Pi is restarted.
Serialless scripts
poweralarm_serialless.py: This script compares the time of the Raspberry Pi with the time of the StromPi and overwrites the older time with the newer time. Additionally, if the primary power supply fails, it sends an email to the email address specified in the script. Another email is sent when the primary power supply is restored or the Raspberry Pi is rebooted.
powershutdown_serialless.py: This script shuts down the Raspberry Pi when the primary power supply fails. The script has its own shutdown timer. This specifies the time to wait for the power supply to be restored before shutting down the Raspberry Pi. This is preset to 10 seconds.
RTC_serialShutdown_serialless.py: This script has all functions of the powershutdown_serialless.py script and additionally compares the time of the Raspberry Pi with the time of the StromPi. The older of the two times is overwritten with the more current one.
RTC_Email_serialless.py: This script compares the time of the Raspberry Pi with the time of the StromPi and overwrites the older time with the more current time. Additionally, if the primary power supply fails, it sends an email to the email address stored in the script. Another email is sent when the primary power supply is restored or the Raspberry Pi is rebooted.
RTCSerialless.py: This script was created especially for the serialless mode. When starting the script, the serialless mode is terminated, so that the time of the Raspberry Pi and the time of the StromPi can be compared and the older time is overwritten with the more current time. After that the serialless mode is activated again.
Start_Serialless.py: This script starts the Serialless-Mode to disable all serial communication between the Raspberry Pi and the StromPi.
Stop_Serialless.py: This script stops the Serialless-Mode to re-enable the serial communication between the Raspberry Pi and the StromPi.
Die Skripte lassen sich in den Autostart des Raspberry Pis kopieren. So werden diese bei jedem Start ausgeführt.
Öffnen Sie dazu zunächst die Datei rc.local mit dem folgenden Befehl:
sudo nano /etc/rc.local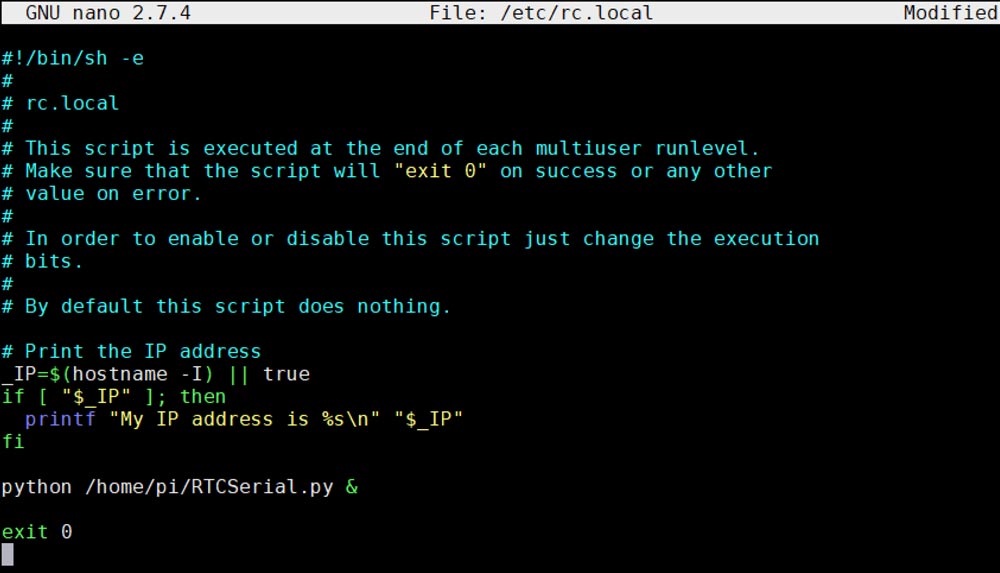
Fügen Sie nun den folgenden Befehl vor dem Befehl "exit 0" ein. Ersetzen Sie hierbei Skriptname.py mit dem Skript, sowie dem entsprechenden Speicherpfad, welches Sie in den Autostart kopieren möchten.
python /home/pi/Skriptname.py &Then save the file with the CTRL + O, confirm with Enter and exit the editor with CTRL + X.